Nintendo Space Fever
This is a fantastic entry point for a machine project; a Nintendo Space Fever cocktail cabinet which has already been restored by a friend to an incredibly high standard. All that remains is to add some working electronics. Special thanks to Ace1942 for the skill and attention to detail which flowed into the restoration of the machine you see here.
This story began innocently enough, some time ago as I was asking around for an empty cocktail cabinet to install my repaired Omori Shuttle Invader PCB into. That's a rare and obscure Japanese Invader 'clone' which I thought would be impossible to find an original cabinet for so I broadened my search to any similar machine which could be adapted to suit.
Said friend had the makings of a Space Fever cocktail machine which was surplus to requirements, as it was in rough shape and incomplete I had no reservations about converting it to a different game, tidying it up to a useable state along the way. When he offered to do some of the cabinet repair work in return for some PCB repairs I had recently completed I gratefully accepted.
I soon realised that my idea of repairing a machine to useable condition and his vision of a museum quality restoration were vastly different and the machine which began as a pile of crap was already shaping up to be 'too good' for a conversion to some other game. I began to look around for some genuine Space Fever PCBs.
As these things somehow fall into place I found a number of non-working Space Fever PCBs which could hopefully be repaired. Meanwhile he spotted a non-working, original Shuttle Invader machine which had come up for sale. I jumped on it and from that point the Shuttle Invader and Space Fever had become separate projects in their own right.
That was a little over 12 months ago and since then I've managed to repair two sets of Space Fever PCBs, one colour and the other Black and White as well as the second Shuttle Invader PCB from the non-working machine. So now I have 2 working PCBs for that machine as well - but getting back to Space Fever, here is the machine as I've received it.
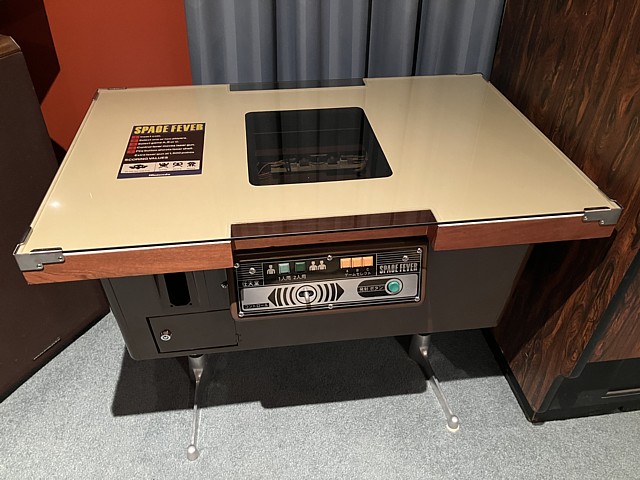
The cabinet looks spectacular having been blasted and powdercoated, new coin door made from scratch, control panels polished with new graphic overlays. The top has been repaired, relaminated and trimmed with new edge veneer.
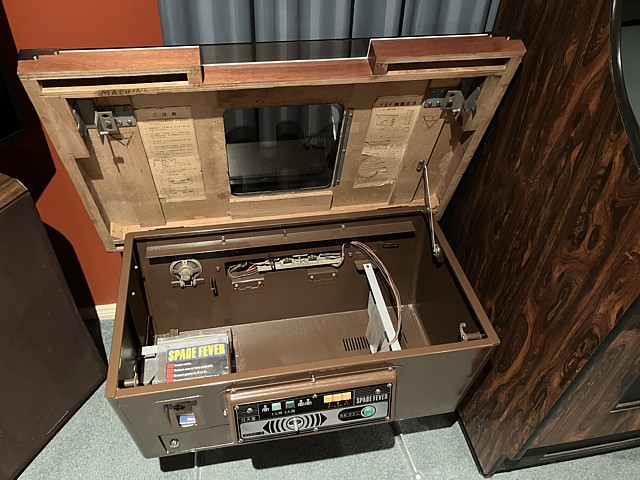
Inside, important details such as original operating notes in Japanese text have been retained. The legs have been stripped, repainted and aluminium feet polished, the monitor frame and mounting panels for the game PCBs have also been restored or made from scratch.
Aside from the cabinet itself I've received some original electronics including the transformer and linear power supply, Black and White CRT and monitor chassis. These are in 'as found' apparently very poor condition so the first step will be to assess these original components to see if any can be repaired and retained.
If original components can't be repaired or exact replacements found I may substitute a more modern component for example a switchmode power supply in place of the notoriously bad original Nintendo unit but will try to ensure any modifications are completely reversible without any cutting, drilling or changes to the overall appearance of the machine.
My latest arcade machine project is a Nintendo Space Fever, the beautifully restored cocktail cabinet was given to me in return for some PCB repairs. To complete the project all that really needs to be done is the internal electronics and wiring. I have already sourced and repaired some genuine Space Fever game PCBs so the Black and White monitor and linear power supply will be the main issues.
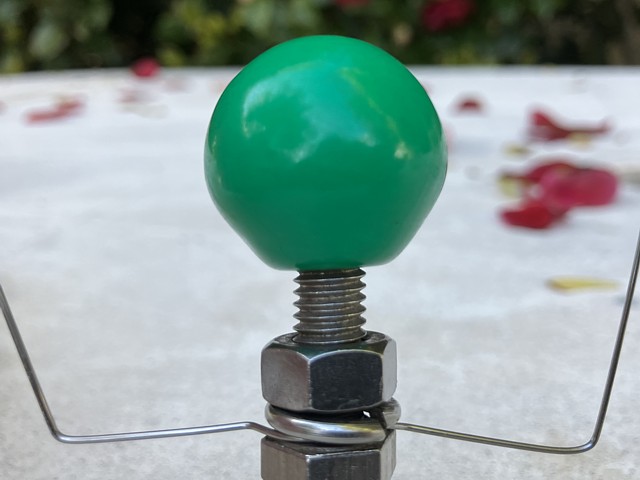
Externally the machine looks perfect, the only parts which are noticeably missing are the coin mechanism (which needs to be the early style with narrow face plate) and the ball top knobs for both players 2 way joysticks. That sparks a whole conversation about what those should be - I'm reliably informed the very early, black and white machines would have had a small green ball top.
The green knobs featured in early photos and flyers for Space Fever while later units were fitted with black ones. Apparently original green knobs are quite sought after as new replacements aren't readily available in the correct size and colour. I can't help wondering, if those aren't available - whether a 3D printed version would be an alternative...
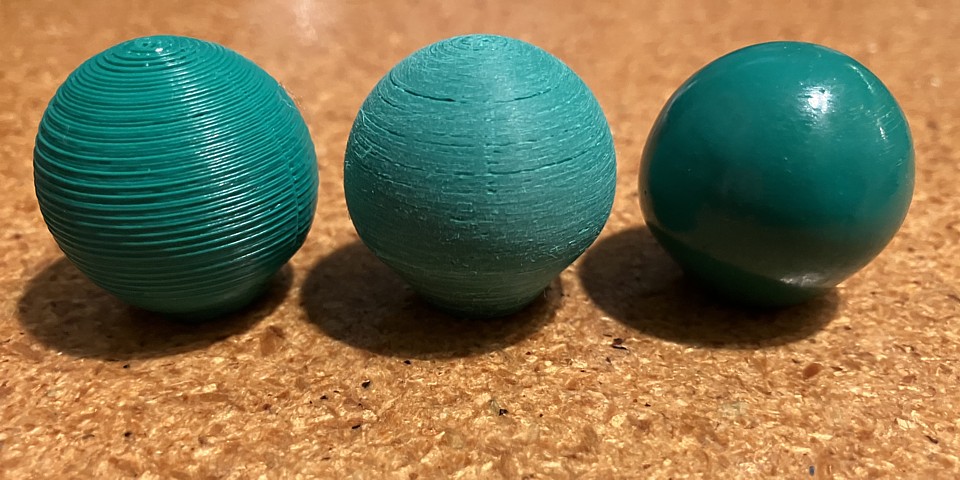
So rather than getting on with some real repair work I'll experiment with 3D printing some ball top knobs in green. Looking through my filament I have some deep green ABS which looks like a reasonable colour match for the original green fire button. Doing some searching, the cocktail knobs are apparently 25mm diameter and measuring the mounting thread diameter and pitch that comes in at 8mm ISO metric.
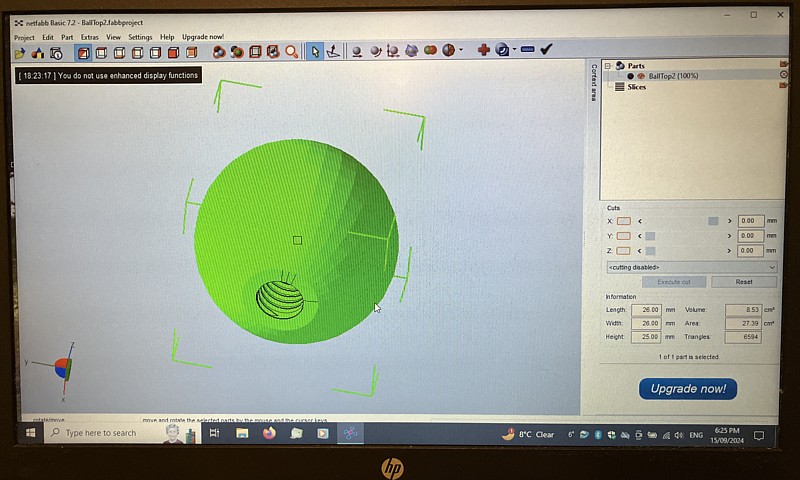
Here I've drawn a simple sphere with a small flat which will be the base of the print, with an 8mm internal thread. The thread may not print perfectly but will be a good starting point, if it works out a little tight to begin with I can chase the thread with an 8mm tap for an exact fit. The first print attempt was a bit lumpy near the base as the filament printer has trouble printing overhanging areas without additional supports.
To avoid that issue I amended the original drawing to change the lower part of the knob to a constant 45 degree slope which the printer can reproduce without the need for additional supports. The knob ends up slightly baton shaped rather than a perfect sphere but the difference is not obvious as that part is at the rear facing the control panel and not really visible. Anyway the second attempt prints well and I'm happy with the result.

The knob fits well and the colour is a reasonable match for the fire button seen in the background. The 3D layer lines are quite obvious and the part would never pass for an original but I usually don't mind if 3D printed parts have a distinct, non-original appearance. To date I've never attempted any smoothing process on 3D printed parts so as an experiment I'll try that to see if a smooth, shiny finish can be achieved.
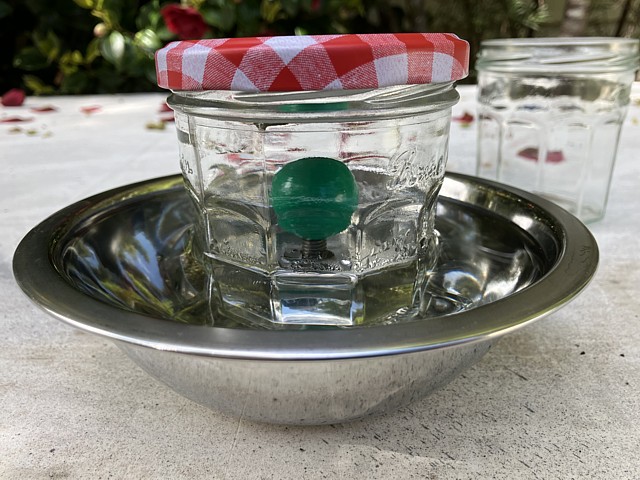
After some reading, the process I'll try will use acetone vapour to smooth over the surface of the part. (Obviously, safety precautions printed on the solvent container must be followed.) I've lightly pre-sanded the part to remove high spots, using a battery drill to rotate the knob (with the 8mm tap as the spindle). The knob is suspended within the jar by some wire to prevent contact with the liquid and the lid placed loosely on top to contain the vapour without allowing any pressure to build up.
Warm water is added to the outer bowl to encourage vapour within the jar and the part left for about 20 minutes or so until the water has returned to ambient temperature. The process can be repeated once or twice if the result looks incomplete but too many attempts or too long a duration will result in the surface running and colour pigments separating within the plastic.
One of the first attempts looks really good so I'm optimistic enough to continue. Over the next several tries various issues present from lumps which won't go away and grooves which won't smooth over to blotches in the colour but eventually after about 10 attempts I've had 2 successes which have no obvious defects. The photo below shows the stages from as printed to sanded and final product.
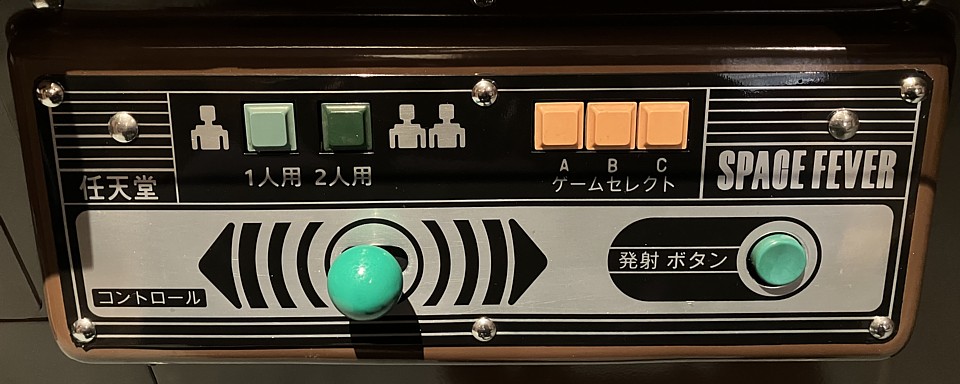
And here's one of the smooth, shiny, green printed knobs on the machine's restored control panel. What do you think?
My Space Fever machine project had taken a back seat for the last few months while I worked on some other PCB repairs and projects. I already have a working game PCB set for the machine, which I repaired earlier so the main concerns will be the original Black and White monitor and linear power supply which are both in poor, as found condition. If either turn out to be unrepairable an alternative would need to be found.
In the case of the power supply, a simple solution would be to substitute a modern switchmode arcade power supply unit. For the monitor one alternative would be to substitute the internals from a portable Black and White television, with suitable AV mod to accept the video and sync signals from the Space Fever game PCB.
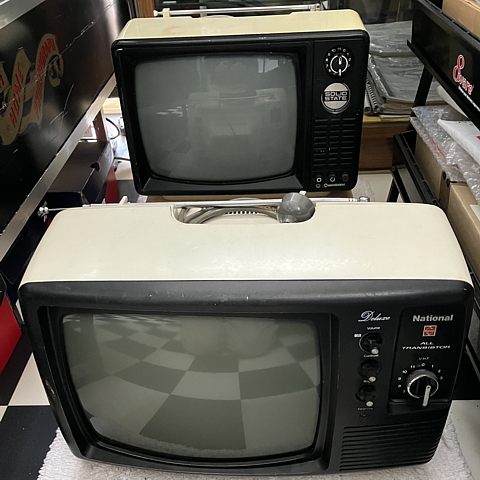
Although Black and White portable TVs in working or repairable condition are becoming hard to find I have managed to pick up a couple of potential donor TVs recently. If not required for the Space Fever machine the TVs will make great, period correct monitors for my retro computer projects.
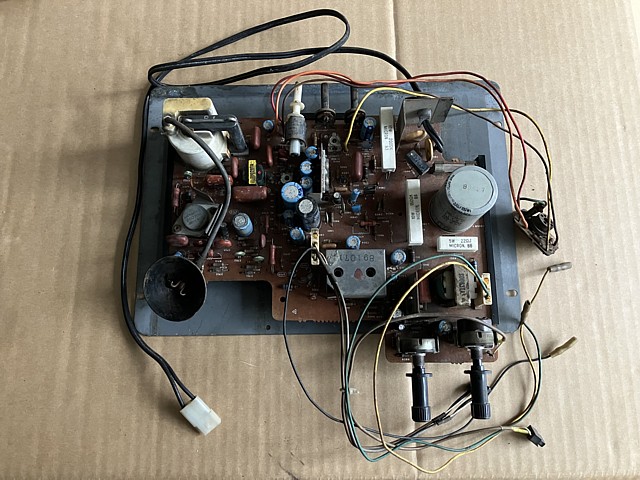
Starting with the original power supply components there are two transformers; the larger one is a 240V - 100V stepdown transformer added by the machines importer to work on Australian mains Voltage. The smaller one is the original Nintendo unit which takes 100V AC in and provides the three secondary AC Voltages for the linear regulator module as well as a 1:1 isolated 100V AC supply for the monitor.
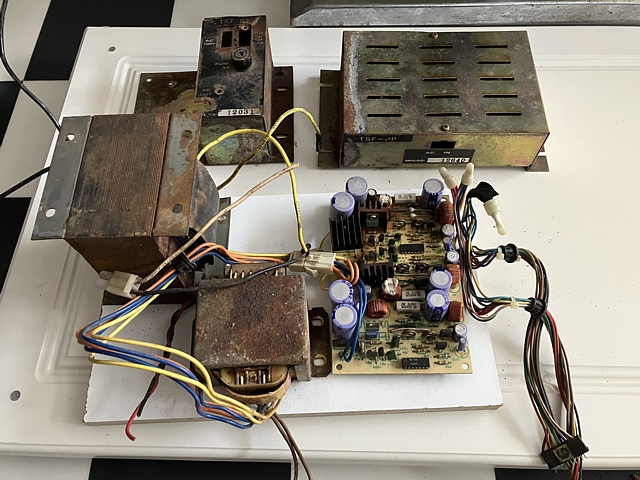
I've removed the transformer and regulator PCB from their housings which are quite rusty but repairable. The transformer's outer casing is also very rusty so I'll set the components up on a board to test them and see whether they are working at all and worth saving.
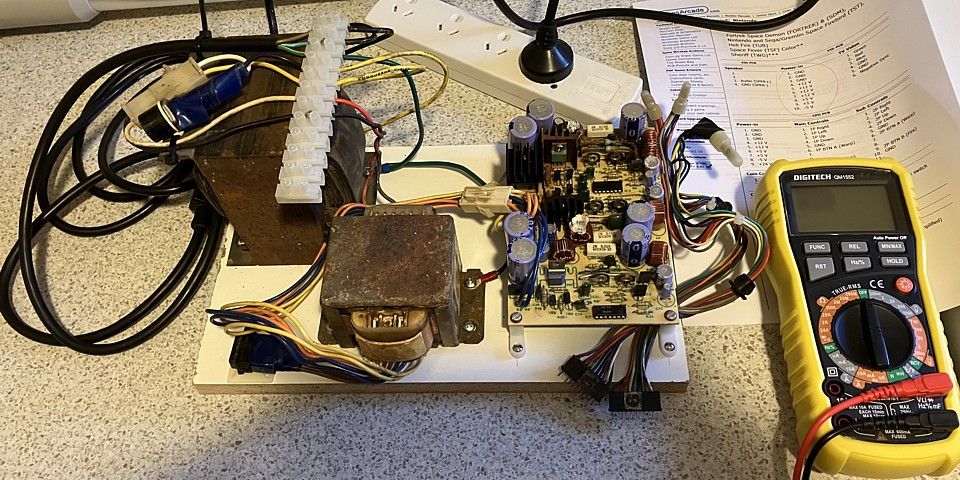
It turns out the transformer is still working and all of the DC Voltages are present at the output of the regulator circuit so I should be able to retain the linear power supply in this machine. This particular regulator module is an early style which was common to the Black and White machines, the later versions found in the colour machines used hybrid IC modules to reduce the component count on board but were no more reliable.
I will replace electrolytic capacitors in the regulator module as the last one I worked on had several capacitors which were leaking electrolyte onto the PCB. As far as I know there are no circuit diagrams available for this version. I've also since found and bought another transformer module which is in better condition and less rusty so that will save some work.
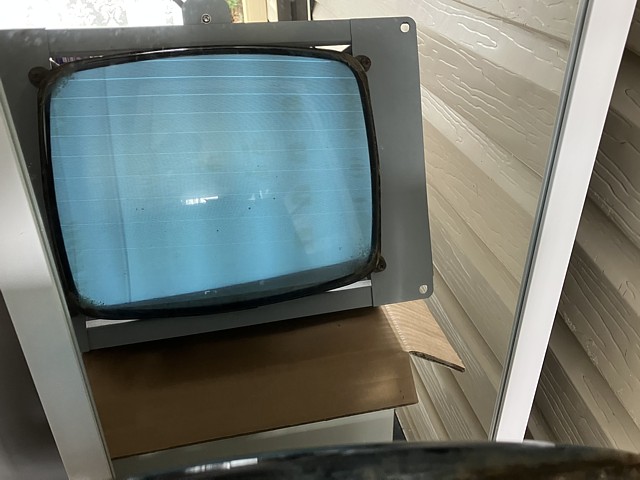
Moving on to the monitor CRT and chassis, the CRT has some Space Fever burn on the phosphor which I'm not too concerned about. Although visible when viewed in daylight, when operating it should not be bad enough to affect the intensity in those areas. Phosphor burn on monochrome CRTs seems to appear more obvious on the surface than for colour tubes.
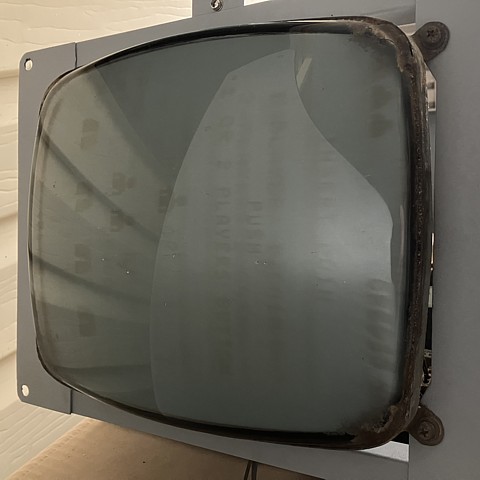
There are some small scratches and chips on the face of the CRT which are of more concern but at this stage I don't have a suitable replacement which will work with the original chassis. Both of the CRTs in my portable TVs are listed as not being pin compatible with the original 310GNB4A type. That brings us to the original chassis which appears to have a number of issues.

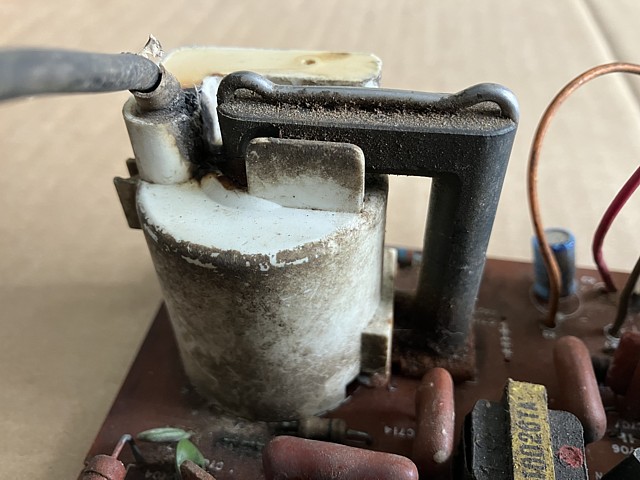
Although complete, the chassis PCB has some cracks and corresponding broken tracks which could be repaired but on closer inspection the flyback transformer appears charred where the H.T. cable emerges so has obviously been arcing at that point. The chances of sourcing a compatible flyback transformer would be pretty slim, all of the flyback transformers in my 'spare' B/W TVs and chassis have different type numbers.
The next best option would be to substitute the entire workings from one of my TVs (minus the tuner of course) and work out a suitable AV mod for the Space Fever video and sync signals. As luck would have it however, while procrastinating on the best course of action a complete original Space Fever B/W chassis came up for grabs. Untested and not in great condition but no obvious cracks or burns so definitely worth a try!
I would usually prefer to test a PCB before replacing any components but in this instance the B/W monitor chassis has obviously been in storage for a very long time, is pretty grubby and some of the components have been pushed over which may have lifted pads or broken tracks on the solder side. So I'll give the PCB a once over first, replacing electrolytic capacitors and cleaning each section of the PCB as I go.
That done, a few lifted pads repaired and it's time for the power on and test (using a 240V - 100V isolation / stepdown transformer). I also checked the line output transistor which seems OK and the fuse was not blown which is promising - so here goes:
Terrific! the monitor silently comes to life and, turning the brightness up reveals the background raster. The monitor is free running at this stage with no video or sync signal so it's time to connect a source and see how it looks.
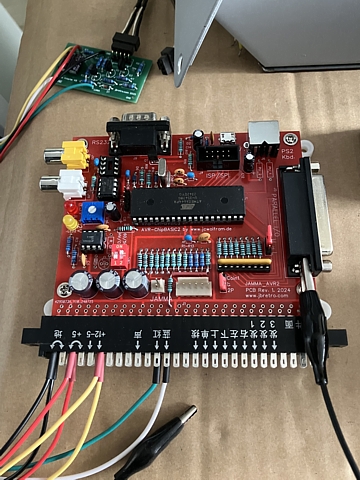
I'm using two of my recent PCB projects to produce the test signal; my JAMMA-AVR2 computer board which is running my test pattern generator program (written in BASIC) and video adapter PCB which inverts the sync signal from the JAMMA source to provide the 12V positive sync used by the Space Fever Black and White monitor. The computer outputs 15kHz RGBs at 50 /60Hz selectable, in this instance we're running at 60Hz vertical frequency.
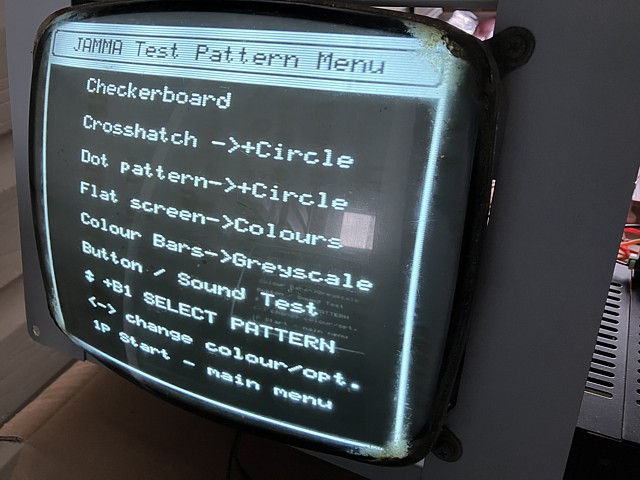
So far, so good. The test patterns can be selected from the menu using a PS2 keyboard or JAMMA connected joystick and buttons. In this case I'm just using a wire link to select the joystick or button input on the JAMMA connector pins. There's no need to combine the three colour signals as the patterns I need are black and white anyway so I'm just using the green video output connected to the Luminance input on my video adapter PCB.
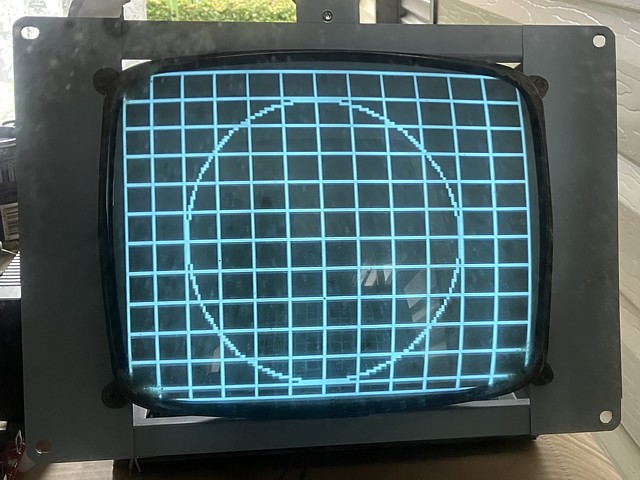
The crosshatch pattern is useful for checking geometry and the circle especially helpful for showing linearity errors in either axis. The vertical linearity did need adjustment, followed by readjusting the V size and then re centering the image using the magnetic rings at the back of the deflection yoke. A colour CRT usually has magnetic rings for colour purity and static convergence but this monochrome CRT just has one pair for image centering.
Looking at that image the linearity in the horizontal axis isn't perfect but there is no simple adjustment available for horizontal linearity or width. That wouldn't be too obvious on the normal game screen and the monitor is really just a converted black and white portable TV circuit after all.
On that note, I've been doing some research to determine what television the Space Fever B/W monitor is based upon. Reading some documentation for other Nintendo Black and White cocktail machines from the same period I found that the portable television which is mounted within the cocktail cabinet for Computer Othello (1978) is a Sharp model 12P-J8R/M and seems to have its controls in the same positions as for the Space Fever B/W monitor chassis.
That's a vital clue and although I can't find any documentation for that exact model, searching for circuit information relating to any Sharp 12P model I have found a close match in model 12P-37MC. The PCB layout is almost identical with the majority of components having the same locations and values so that should be a very useful document for servicing or troubleshooting any issues with the Space Fever B/W monitor.
To be continued...
Web Resources (External Links) -
Space Fever (colour version) interconnection pinouts - CrazyKong.com
SHARP 12P-37MC Schematic diagrams - ElektroTanya.com
All images and text on this website are Copyright.
Contact: jbtech at telstra dot com